How to Fix Rusty Garden Pruning Shears
For gardeners, nothing is more frustrating than grabbing your go-to pruning shears only to find them covered in rust—stiff, dull, and completely useless for trimming roses, shrubs, or vegetable plants. Rust doesn’t just ruin the look of your garden tools; it weakens the metal, creates jagged cuts (which harm your plants), and shortens the lifespan of your shears. The good news? You don’t need to throw them away or buy expensive replacements. At Easy Garden Tool (easygardentool.com), we’re dedicated to providing simple, effective solutions for gardeners of all skill levels. In this guide, we’ll show you exactly how to fix rusty garden pruning shears in just a few easy steps, using common household items or affordable tools you can find at your local hardware store. Plus, we’ll share pro tips to prevent rust from coming back, so your pruning shears stay sharp and reliable for years.
Why Do Garden Pruning Shears Rust?
Before you start fixing rusty pruning shears, it helps to understand why rust forms in the first place. Pruning shears—like most garden tools—are made of iron or steel, which react with moisture and oxygen in the air to form iron oxide, better known as rust. Garden tools are especially prone to rust because they’re constantly exposed to damp soil, plant sap, rain, and humidity. Leaving your shears outside overnight, storing them in a damp shed, or even forgetting to dry them after use can speed up rust formation. Even a small amount of moisture can cause unsightly rust spots, and over time, heavy rust can seize the moving parts, making your shears impossible to open or close.
The good news? Light to moderate rust is easy to fix. Even heavily rusted shears can often be restored with a little elbow grease. Let’s start with what you’ll need.
What You’ll Need to Fix Rusty Garden Pruning Shears
You don’t need fancy equipment to restore your rusty pruning shears. Most of these items are probably already in your home, or you can pick them up cheaply at a garden center or hardware store. Here’s your checklist (designed for simplicity and beginner-friendliness, just like all our guides at easygardentool.com):
- Safety gear: Rubber gloves (to protect your hands from rust and cleaning solutions) and safety goggles (to shield your eyes from debris)
- Cleaning supplies: Warm water, mild dish soap, a stiff-bristled brush (or old toothbrush for tight spots), and clean rags or paper towels
- Rust removers (choose one based on what you have on hand):
- Natural option: White vinegar, lemon juice + salt (great for light rust)
- Effective option: WD-40 Specialist Rust Remover Soak (gentle on plastic handles) or a neutral rust remover (safe for all tool materials)
Abrasive tools: Fine-grit sandpaper (120–240 grit), steel wool, or a sanding block (for scrubbing away tough rust)
Sharpening tool: A sharpening stone, metal file, or pruner-specific sharpener (rust often dulls blades—sharpening is key for clean cuts)
Lubricant: WD-40, 3-in-1 oil, or linseed oil (to prevent future rust and keep moving parts smooth)
Optional: Screwdriver (for disassembling shears if needed, to clean hard-to-reach spots)
Step-by-Step Guide to Fix Rusty Garden Pruning Shears
Follow these simple steps, and your pruning shears will be rust-free, sharp, and ready to use in no time. We’ve kept the process straightforward—perfect for beginner gardeners who want easy, hassle-free tool maintenance (that’s the Easy Garden Tool promise!).
Step 1: Clean Off Dirt and Debris First
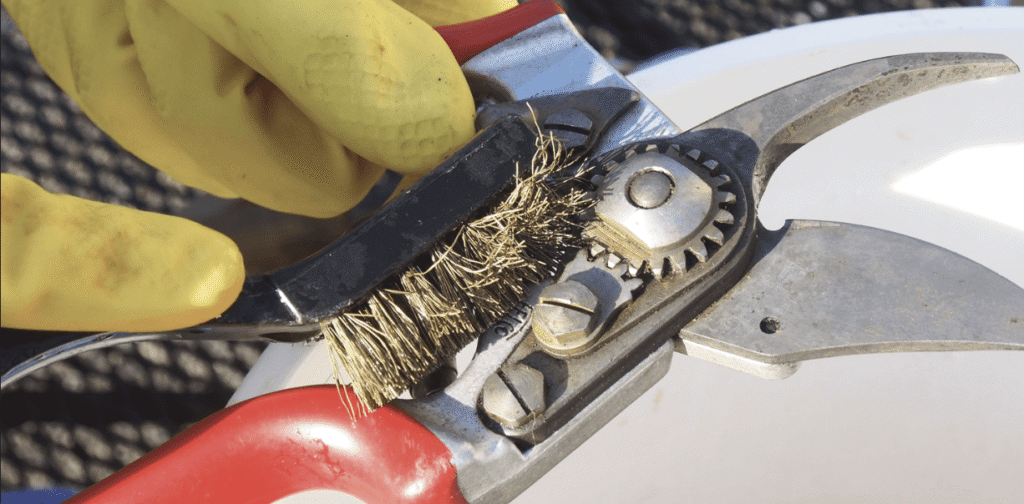
Before tackling rust, you need to remove any dirt, plant sap, or debris from your shears. Rust thrives on damp, dirty surfaces, so a clean base will make your rust-removal efforts much more effective. Fill a bowl with warm water and a few drops of mild dish soap. Dip your stiff-bristled brush into the soapy water and scrub the blades, handles, and pivot point (the center bolt where the two blades meet) thoroughly.
or tough sap or caked-on dirt, use an old toothbrush to get into tight spots, or scrape gently with a plastic putty knife (avoid metal scrapers, which can scratch the blades). Once the shears are clean, rinse them with clean water and dry them completely with a rag or paper towel. Never skip drying! Leaving moisture on the metal will only make rust worse. If your shears have wooden handles, wipe them with a dry rag—avoid getting them too wet, as this can cause warping.
If your pruning shears can be disassembled (check for a screw or bolt at the pivot point), take them apart with a screwdriver. This allows you to clean and remove rust from every nook and cranny—especially the pivot point, which often gets rusty and seized up. Lay the parts out in order (or take a photo with your phone) so you remember how to reassemble them later. If your shears can’t be disassembled (some cheaper models don’t come apart), don’t worry—you can still clean them effectively without taking them apart.
Step 2: Disassemble (Optional, But Recommended)
If your pruning shears can be disassembled (check for a screw or bolt at the pivot point), take them apart with a screwdriver. This allows you to clean and remove rust from every nook and cranny—especially the pivot point, which often gets rusty and seized up. Lay the parts out in order (or take a photo with your phone) so you remember how to reassemble them later. If your shears can’t be disassembled (some cheaper models don’t come apart), don’t worry—you can still clean them effectively without taking them apart.
Step 3: Remove Rust Using Your Preferred Method
Now it’s time to tackle the rust. Choose one of the methods below, based on how much rust you’re dealing with and what supplies you have on hand. All methods work—pick the one that’s easiest for you.
Method 1: Natural Rust Removal (Lemon Juice + Salt or White Vinegar)
This is our favorite method for light to moderate rust—it’s affordable, non-toxic, and uses items you probably already have at home. Great for gardeners who prefer natural, chemical-free tool maintenance.
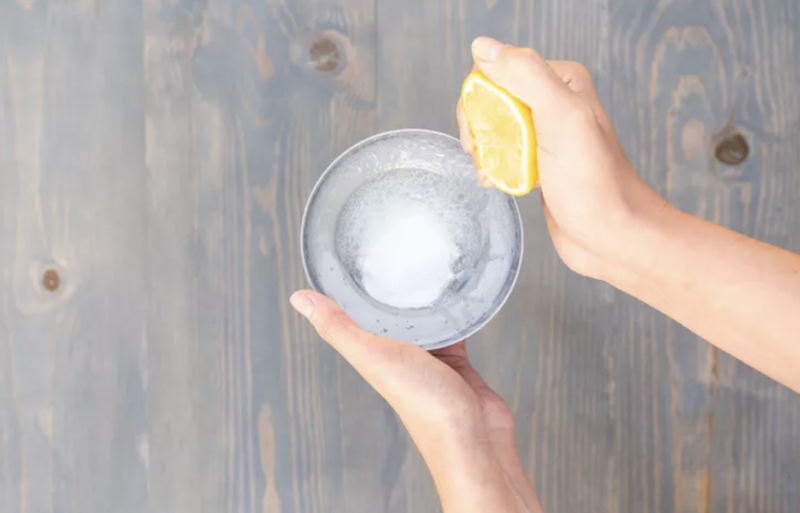
- Lemon Juice + Salt Paste: Mix lemon juice and salt to make a thick paste (the consistency of toothpaste). Apply the paste generously to all rusty areas, making sure to cover the rust completely. Let it sit for 15–30 minutes—the acid in the lemon juice will break down the rust, and the salt will act as an abrasive to scrub it away. After the paste has sat, use steel wool or fine-grit sandpaper to scrub the rust off in circular motions. Wipe clean with a dry rag, and repeat if any rust remains.
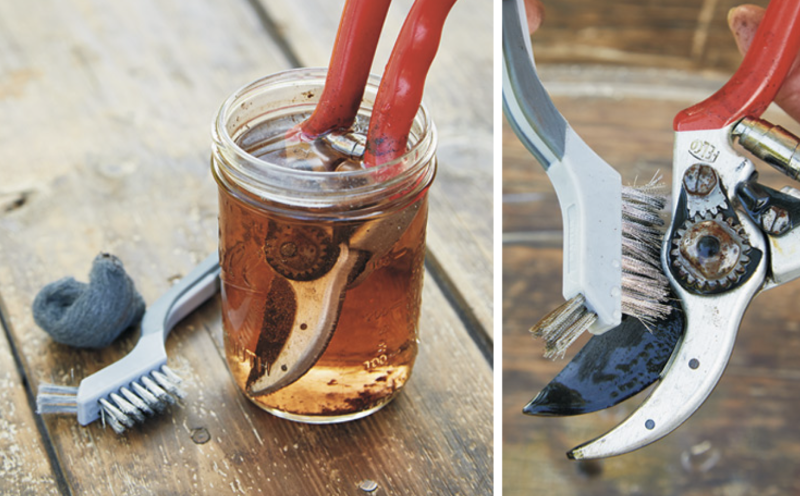
- White Vinegar Soak: For more stubborn rust, fill a bowl or container with white vinegar (enough to submerge the rusty parts). Place the shears (or disassembled parts) into the vinegar and let them soak overnight (8–12 hours)—the vinegar will dissolve the rust gradually. If you can’t submerge the entire shear, soak a rag in vinegar and wrap it around the rusty areas, rewetting the rag every few hours. The next day, remove the shears from the vinegar and scrub away any remaining rust with steel wool or sandpaper. Rinse with clean water and dry completely.
Method 2: Commercial Rust Remover (For Heavy Rust)
If your shears are heavily rusted (large, flaky rust spots, or seized pivot points), a commercial rust remover will work faster and more effectively. We recommend WD-40 Specialist Rust Remover Soak, which is gentle on plastic handles and safe for most metals. Follow these steps:
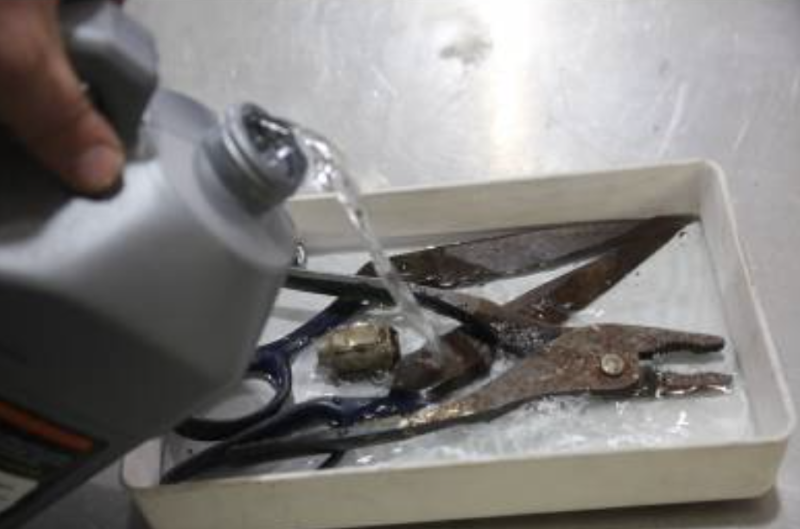
- Put on your safety gloves and goggles (commercial rust removers can be harsh on skin and eyes).
- Fill a container with the rust remover, following the instructions on the bottle (don’t dilute unless directed).
- Submerge the rusty parts of the shears in the solution (or soak a rag and wrap it around the rusty areas). Let it sit for the time recommended on the bottle (usually 15–30 minutes for moderate rust, or longer for heavy rust).
- Remove the shears from the solution and scrub away any remaining rust with steel wool or sandpaper. Rinse thoroughly with clean water and dry completely to prevent new rust from forming.
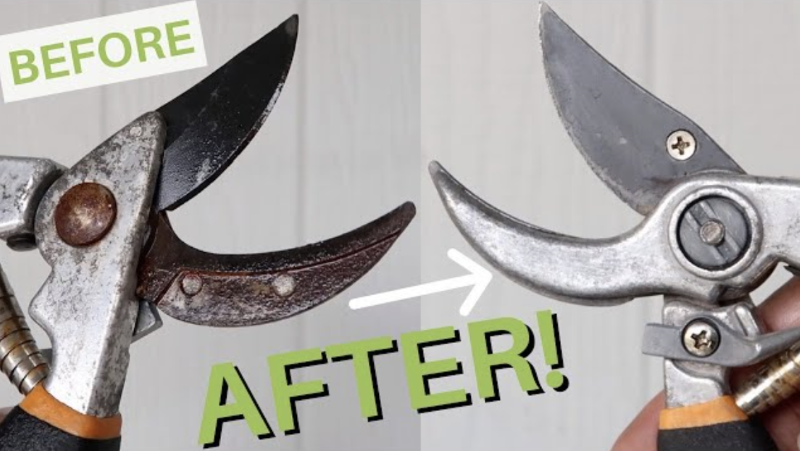
Step 4: Sharpen the Blades (Critical Step!)
Rust often dulls pruning shear blades, so even if you remove all the rust, dull blades will still make pruning frustrating and harm your plants (jagged cuts can lead to disease and slow healing). Sharpening your shears is easy—here’s how:
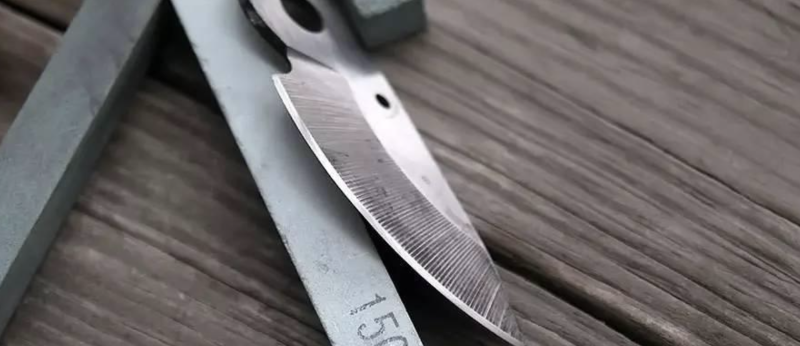
- Hold the shear in one hand, keeping the blade steady (you can clamp it to a workbench if you have one, for extra stability).
- Take your sharpening stone or file and hold it at the same angle as the blade’s bevel (usually 20–30 degrees—follow the existing angle to avoid damaging the blade).
- Run the stone or file along the blade, from the base (near the handle) to the tip, applying light to medium pressure. Repeat 10–15 times, only sharpening in one direction (don’t back-and-forth, as this can dull the blade).
- Flip the shear over and remove any burrs (tiny metal fragments) from the back of the blade with a few light strokes of the file.
- Test the sharpness by cutting a piece of paper or thin twig—if it cuts cleanly and easily, you’re done! If not, repeat the sharpening process.
Step 5: Lubricate and Reassemble (If Disassembled)
Now that your shears are rust-free and sharp, it’s time to lubricate them to prevent future rust and keep the moving parts smooth. This step is crucial—lubrication creates a protective barrier against moisture and oxygen, stopping rust before it starts.
- If you disassembled your shears, apply a few drops of lubricant (WD-40, 3-in-1 oil, or linseed oil) to the pivot point and any other moving parts. Wipe off any excess oil with a rag—you don’t want oily residue getting on your plants.
- Reassemble the shears by putting the parts back together in the same order you took them apart. Tighten the pivot screw or bolt gently—don’t over-tighten, as this can make the shears stiff to open and close.
- Even if you didn’t disassemble your shears, apply lubricant to the pivot point and wipe a thin layer of oil on the blades (this protects against rust and keeps them smooth).
Step 6: Final Clean-Up
Wipe down the entire shear with a clean, dry rag to remove any remaining rust particles, oil residue, or cleaning solution. Check the shears by opening and closing them a few times—they should move smoothly, with no stiffness. If they’re still stiff, apply a little more lubricant to the pivot point.
Pro Tips to Prevent Rust on Garden Pruning Shears (From Easy Garden Tool)
Fixing rusty shears is easy, but preventing rust in the first place is even better. Follow these simple tips to keep your pruning shears (and all your garden tools) rust-free for years:
- Clean and dry after every use: This is the most important tip! After pruning, wipe your shears with a dry rag to remove dirt, sap, and moisture. If they’re especially dirty, rinse with warm water, then dry immediately.
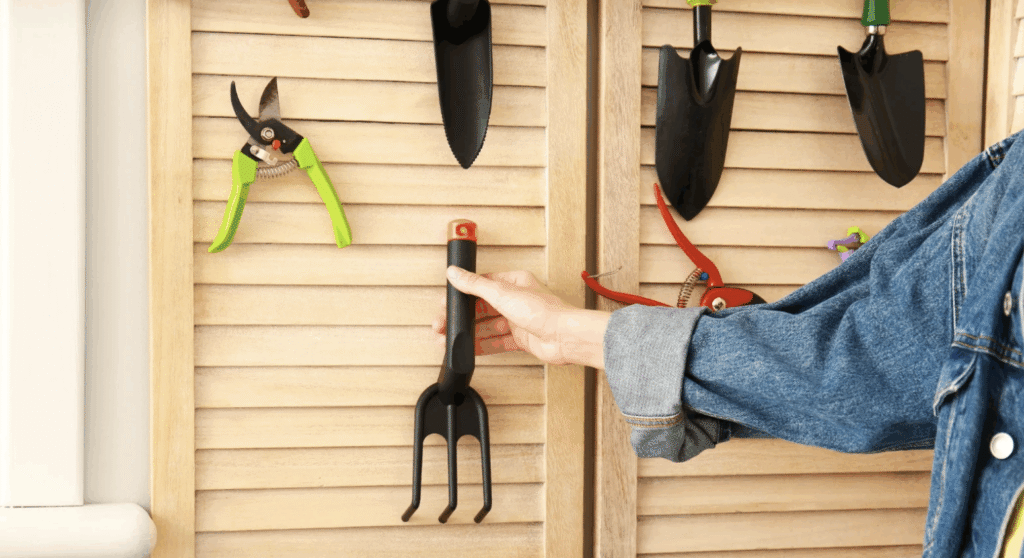
- Store in a dry, well-ventilated area: Keep your shears in a shed, garage, or toolbox that’s dry and well-ventilated. Avoid storing them outside or in damp areas (like a basement with high humidity). For extra protection, hang them on a wall—this allows any remaining moisture to escape.
- Apply a light layer of oil before long-term storage: If you’re putting your shears away for the winter (or not using them for a few weeks), apply a thin layer of oil to the blades and pivot point. This creates a protective barrier against moisture.
- Use a sand-oil bucket for daily maintenance: Fill a 5-gallon bucket 4/5 full of sand, then mix in about a quart of car engine oil. After each use, plunge your shears into the bucket a few times—this cleans the blades and coats them in oil, preventing rust.
- Disinfect after use on diseased plants: If you prune plants with diseases, wipe your shears with rubbing alcohol or a 10% bleach solution (rinse and dry immediately afterward) to kill bacteria and fungi. This also helps prevent rust, as bleach can cause corrosion if left on the metal.
- Avoid leaving metal parts in contact with soil or concrete: Soil and concrete retain moisture, which can cause rust. If you set your shears down while gardening, place them on a dry surface (like a bench or tarp) instead of the ground.
When to Replace Your Pruning Shears (Instead of Fixing Them)
Most rusty pruning shears can be fixed with the steps above, but there are a few cases where replacement is better. At Easy Garden Tool, we want you to get the most out of your tools—but sometimes, a new pair is more cost-effective than fixing severely damaged shears. Replace your pruning shears if:
- The blades are cracked, bent, or pitted (deep rust holes that go through the metal)—these can’t be fixed and will make pruning unsafe and ineffective.
- The pivot point is seized beyond repair (even after soaking in rust remover and lubricating, it won’t move smoothly).
- The handles are broken or warped (wooden handles that are split, or plastic handles that are cracked).
- The blades won’t hold a sharp edge (even after sharpening, they dull quickly)—this means the metal is worn out.
If you do need to replace your pruning shears, check out easygardentool.com for our top picks—we curate affordable, high-quality garden tools that are easy to maintain and built to last.
Final Thoughts: Fix Rusty Pruning Shears in Minutes, Save Money
Rusty pruning shears don’t have to be the end of the line. With a few simple supplies and our step-by-step guide, you can restore your shears to like-new condition in no time—saving money on replacements and keeping your garden tools in top shape. Remember: regular maintenance (cleaning, drying, lubricating) is the best way to prevent rust, so make it a habit after every use.
At Easy Garden Tool (easygardentool.com), we’re dedicated to making gardening easier for everyone—from beginner gardeners to seasoned pros. Whether you need help fixing rusty tools, choosing the right pruning shears, or learning how to maintain your garden equipment, we’re here to help. For more gardening tips, tool guides, and product recommendations, be sure to check out our blog and follow us on social media.
Happy pruning—and here’s to rust-free garden tools!
FAQs About Fixing Rusty Garden Pruning Shears
Q: Can I use baking soda to remove rust from pruning shears?
A: Yes! Mix baking soda with a little water to make a paste, apply it to rusty areas, let it sit for 30 minutes, then scrub with steel wool. For extra power, mix baking soda with lemon juice instead of water.
Q: How long should I soak pruning shears in vinegar to remove rust?
A: For light rust, 1–2 hours is enough. For moderate to heavy rust, soak them overnight (8–12 hours) for the best results.
Q: Do I need to sharpen my shears after removing rust?
A: Yes! Rust dulls blades, so sharpening after rust removal ensures clean, smooth cuts that are better for your plants. Dull blades can damage plant stems and lead to disease.
Q: What’s the best lubricant for pruning shears?
A: WD-40, 3-in-1 oil, or linseed oil all work great. Linseed oil is especially good for wooden handles, as it conditions the wood while protecting against moisture.
Q: How often should I clean and lubricate my pruning shears?
A: Clean and dry them after every use. Lubricate the pivot point every 1–2 weeks (or after heavy use) to keep them smooth and rust-free. For long-term storage, apply a light layer of oil before putting them away.